Showing posts with label St.Louis Post. Show all posts

Thursday, March 29, 2012

Easy to Make Spring Wreath!


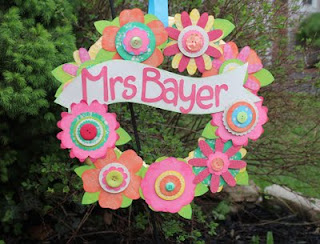
This is my most recent craft featured in the St.Louis Post Dispatch. I love it because not only does it brighten up my door..it's kid friendly!

Spring is in the air, and that means time to brighten up your home with new décor. With Easter on the horizon, it's the perfect time to use all the beautiful crafts and goods you can find in your local craft store to help push those winter blahs right out the door.
One of the best ways to capture that feeling is to welcome those to your home with a spring wreath. And even better, it's kid-friendly and makes for an easy craft everyone can help with.
SUPPLIES NEEDED
• Styrofoam wreath
• Loops & Thread "Soft Fern" yarn (Michael's stores)
• Sizzix flower and leaf dies (sizzix.com)
• Pebbles in My Pocket paper flowers
• Sassafrass Lass metal flower
• Glue Arts Extreme adhesive squares (gluearts.com)
• K & Co. dimensional butterfly stickers
• Handbehg Felts wool balls (handbehgfelts.com)
• May Arts ribbon (mayarts.com)
• Wool felt, fabric, buttons
Step 1 • Wrap the wreath with yarn, covering the entire wreath. Use a straight pin or adhesive square to adhere yarn on backside of wreath.
Step 2 • Select your dies and felt colors. Handcut or diecut your flower shapes. I used sizes ranging from 3 3/4 inches to 4 3/4 inches. Kids can choose to use papers and punches instead of felt and dies.
Step 3 • Build the flowers. I used three to four flowers in various sizes. I simply layered the flowers, changing them around until I liked the color combinations. Once you settle on how you like them, adhere them together using GlueArts Extreme adhesive squares.


Step 4 • Adhere the flowers to the wreath using adhesive squares. I selected a few flower stickers, added some butterfly stickers and a chipboard 'spring" sticker and then finished off the tops of the flowers with the fun felted wool balls for added dimension.  
Step 5 • After you've added the flowers you can personalize the wreath or just leave it as is. Consider adding a banner that says "welcome spring" or an initial for your last name. I added a beautiful ribbon.


Read more: http://www.stltoday.com/lifestyles/home-and-garden/home/spring-wreath-offers-visitors-a-happy-welcome/article_2a350b8d-d4a4-59ad-abb6-1f4c8cdeb18c.html#ixzz1qW54vuCM

Saturday, May 7, 2011

Teacher Appreciation Gift Set


For those of you in St.Louis, my craft project can be seen in today's St.Louis Post Dispatch in the Home & Away section page H6.

Teacher Appreciation Gift Set

The Craft Mom: Julia Sandvoss

Over the years I’ve made quite a few teacher gifts. During that time I have gained a reputation at my kids school for my crafty gifts. Many a teacher has remarked to me how much they “liked” a gift I had given to a fellow teacher. (I wonder if that was a hint?!lol) 

During the school year I’ve visited my son’s school on many occasions. And each time I walk through the halls, I notice the teachers classroom doors and the area around them. Some of the teachers decorate outside their doors with benches and knick knacks…while others not quite so fun. 

I started thinking of a way I could make a craft to decorate the classroom door and give a personal welcome to all those who enter. A wreath seemed like the perfect solution!(and can be changed out for holidays, or if they’re a baseball fan, love the beach…you get the idea!) Once I made the wreath it provided the inspiration and theme for the other gifts! Make one…make all…you and your child will soon the the talk of the school!

Wreath, Tote, Clipboard & Candy Jar

Supplies:

Glue Art Glue Glider Pro Extreme Adhesive and PermaTac
Glue Arts Accent It All Vinyl
Glue Arts Extreme Adhesive Squares & Micro Squares
Glue Arts 3D Combo Pack
Cricut Expresssion
Cricut Forever Young Cartridge
Makin The Grad Cartridge
My Little Shoebox Sew Cut Paper Collection
Jenni Bowlin Paper
Bazzill Cardstock
Styrofoam Wreath
Mini Clip Board & Glass Jar
Colorbox Chalk Inks
May Arts Ribbon
Felt, Fabric, Buttons
Circle Punches


Wreath

1) First wrap the wreath with ribbon covering the entire wreath. Use a straight pin or adhesive square to adhere ribbon on backside of wreath.

2) Next select your papers and cut out your flower shapes. I used sizes ranging from 3 ¾ inches to 4 ¾ inches. Varying as I went to give me some different sizes to work with. Once I had cut my flower out I inked the edges with Colorbox Chalk Inks. The color doesn’t need to match the paper exactly but just offer enough color to give some shading to the papers.
3) After inking it’s time to build the flowers. I used 23 flowers and 21 small punched circles. I simply layered the flowers, changing them around until I liked the color combinations. Once I had settled on how I liked them, I started adhering them together using GlueArts Glue Glider Pro PermaTac Adhesive to assure good adhesion. On some pieces I cut a square from the U Cut It foam sheet to pop up a flower layer for added dimension. To adhere the buttons I used the 3d Raisen’s for a strong hold and height.
3) Once the flowers were glued together I then adhered them to the wreath again using my Glue Glider Pro with PermaTac. I selected a few flowers, I cut some additional squares from the U Cut It Foam and added that underneath to raise them up off the wreath.  
4) After you’ve added the flowers you can personalize the wreath or just leave it as is. I handcut a banner and inked the edges. Then I used the Makin the Grade cartridge and cut our teachers name in a 2 1.4 inch size. I lightly inked the letters and glued those to the banner. The banner will tuck easily into the flowers. So it could even be changed out to say Happy Easter, Happy Spring, Welcome etc. Last I added a ribbon and finished it off with a bow. It’s ready for gift giving and will look fantastic on my son’s teacher’s door!


Candy Jar

1) I knew I would work with the same flowers for the jar as I did for the wreath, just on a smaller scale. I selected sizes ranging from 2 to 3 just depending on the flower. Once all the flowers were cut out, I worked the same as with the paper flowers. I built and layered the flowers to try out different combinations until I got it just right. (or how I liked it!)
2) Once I knew I liked the flower I removed the backing paper and adhered the vinyl layers together. After the flowers were complete I added them around the center of the glass jar layering them together as I worked around. The flowers encircle the jar so it’s pretty from any angle. 


Mini Clip Board

1) First I cut my papers to fit the clipboard. Inked the edges and then adhered the background papers to the clipboard using my Glue Glider Pro PermaTac cartridge. Next I added some of my leftover vinyl flowers. I used my Extreme Adhesive Squares to add the buttons to the flower center.
2) I then popped on Microsoft Word and just typed up a simple “to do” list. Printed out a few and trimmed to fit onto the clipboard. I then added one large vinyl flower that is not sticky as it’s backed with cardstock. Used a clip to attach it to the clipboard and you’ve got a fun to do list that can be changed out to fit any need!


Tote Bag

1) Once again I wanted everything to match so I grabbed an assortment of wool and acrylic felt along with some fabric I had on hand. I am a paper piecer by heart so I took my leftover paper flowers and used those as a template for my cuts. I simply hand traced a few of the flowers onto the backside of my felt and fabric and cute those out. Then I again played with layering the flowers until I got them just how I liked.
2) Next I added a quick hand stitch through the centers of each flower. Now it’s time to iron. I used my Glue Glider Pro with Fabric Bond to add a strip of Fabric Bond adhesive to the back of the flowers and ribbons. I pressed each one onto the bag with a warm iron ensuring a good bond has been made.   
3) I tied a ribbon onto the bag handle. On the bottom of one ribbon end I added another flower. For this flower I cut two of the same bottom layer. Add a flower onto the backside of the ribbon.  I neatly stitched again though the center and through the ribbon to ensure it will not fall off the ribbon.

Keep in mind…the wreath, candy jar and clipboard are all kid friendly crafts! Let them help you cut and make the flowers! 


For more information about Cricut visit http://www.cricut.com/default.aspx


For more information about GlueArts www.gluearts.com or www.gluearts.blogspot.com for ideas and ways to use GlueArts adhesives!

Sunday, February 6, 2011

Three Valentine Crafts for those Upcoming Parties!


Valentine's Day crafts by Julia Sandvoss
Valentine's Day crafts, by Julia Sandvoss.
Over the years as a classroom mom, I've heard many a parent stress over having to be "crafty." The thought of coming up with a craft for their student's class is incredibly stressful. For some, it's a competition to see whose kids made the best craft.
When deciding on a craft, I like to make projects that are a keepsake, not something that the day after Valentine's Day, winds up in the recycle bin. I love the crafts that I can display and show off in the years to come. Here are three ideas that can be adapted for kids of all ages, and yes, parents of all types (even those who say they aren't crafty).


LOVE YOU Wood Photo Frame
Project Supplies
• K & Co. "Smooch" papers, die cuts and sticker collection
• Glue Arts Glue Glider Pro Perma Tac, 3D Combo Pac and Extreme Adhesive Squares
• Wood frame (purchased at Michael's)
• Echo Park "Little Girl" craft papers
• May Arts ribbons
• Colorbox Chalk Inks: Warm Red, Rose Pink
• Heart punches (various sizes and shapes)
Step 1 • Turn the frame over and remove the center heart insert. Trace the frame onto paper. Cut out. Use the Glue Glider and adhere the paper onto frame or let the kids paint the frame.
Step 2 • Add some fun papers. Let the kids punch the edges or use decorative edge scissors, add ribbons, punched hearts, diecuts, felt hearts, anything goes. Consider giving the students stickers to personalize the frames with their names or "I love you."
Step 3 • Have the students cut out pictures of themselves. Use the heart insert to trace the shape onto another paper. Cut out heart and glue picture to paper. Insert in back of frame.
If possible see if you can get permission from the teacher to stop in a day or two before the party to take pictures of the students. Or ask if the teacher will do that and e-mail you the photos to print out.

Candy Heart Box
Project Supplies
• K & Co. "Kelly Panacci Valentine" papers, diecuts and embellishment collection
• Glue Arts Glue Glider Pro PermaTac, 3D Combo Pac and Extreme Adhesive Mini Squares Candy heart box (find these for $1 or less at many stores with chocolates inside)
• Felt and felt hearts (found at Michael's)
• The Twinery Baker's Twine (thetwinery.com)
•Colorbox Chalk Inks: Warm Red, Rose Pink
• Rhinestone gems
• Heart punches (various sizes and shapes)
Step 1 • Remove the lid from the candy box (resist eating the chocolates). Trace the lid shape onto a piece of paper. Cut out the heart shape. If you have an older group of students, have them cut an additional heart from felt. Then let them stitch the paper to the felt heart using craft floss. Sew one side to the other side leaving the top of the heart open to create a pocket. For younger students, glue the paper to felt or eliminate the felt layer. Adhere heart onto candy lid using the Glue Glider Pro.
Step 2 • Once the heart is glued to the candy box lid, let the kids have fun decorating it with felt hearts, heart punch shapes, Valentine die cuts, stickers, gems and more.
Step 3 • Create a small Valentine to insert into the pocket. Or include a purchased Valentine.

Acrylic Flower Picture Frame
Project Supplies
• Glue Arts Glue Accent It All Vinyl: Tickle Me Pink, Razzle Dazzle Red, Goin Green (GlueArts.com)
• Acrylic frame (find these for $1 or less at many stores)
• Sizzix Big Shot: Bigz Flower and Frame Dies (Sizzix.com)
• Heart punches (various sizes and shapes)
Step 1 • This craft can be made in a variety of ways. I chose vinyl that I die cut using a Sizzix die-cut system. The vinyl peels off the backing paper and clings to the frame. I can change it out or even remove the vinyl for a new design if I choose. I added a 2 1/2-by-4 inch photo on a coordinating piece of paper and slipped the picture behind the frame. If you do not have access to a die-cut machine or vinyl, round up your other room parents to see what kind of tools they have for you to use. Most crafters have an assortment of scissors, punches and yes ... die-cut machines.
Step 2 • Pick up some felt or craft papers, and let the students cut their designs. Add punched shapes, stickers and other fun Valentine embellishments to add on the frame and decorate as they choose. This frame took just minutes to make and will be a favorite for years to come.

Sunday, January 23, 2011

Valentine Take Out Box & Fortune Cookies


Fortune Cookies


I'll admit...I've got a thing for them. And not so much the cookie although I eat them. I enjoy the suprise of the message that awaits inside the cookie.


I've even saved some of the messages and keep them on my desk..I liked this one:


Past experience. He who never makes mistakes never did anything that's worthy!


Your love of life can carry you through any circumstance.


and my fave...


Treasure what you have!
For my craft I made for the St. Louis Post I really wanted to make a fortune cookie box with messages. I really liked this one...although it did take a bit of playing to figure out the cookies and how to get them to sit just right without opening too much! And the new Papertrey Ink stamps were PERFECT for the messages!! I hope you agree!!


Here's a link to the online article


http://www.stltoday.com/stltoday/lifestyle/stories.nsf/homedecor/story/65D3EBD05BCD5FA1862576C700578941?OpenDocument


PaperTrey Ink Simple Valentine Papers (available at www.papertreyink.com)
PaperTrey Ink Tiny Treats: Valentine Acrylic Stamps
Paper Trey Ink Simple Valentine Acrylic Stamps
Paper Trey Stamper’s Select White Cardstock
PaperTrey Ink Sweet Blush Ribbon
Red Chinese Take Out Box & Red Stripe Ribbon from Michael’s
Heidi Grace Heart Accent
Fiskars Heart Punch and Scallop Border Punch
Marvy Mega Scallop Circle Punch
Colorbox Chalk Inks (available at your local Michael’s Craft Stores)
Glue Arts Glue Glider Pro Adhesive & Glue Arts Ribbon Adhesive
Making Memories Slice Die Cut System Basics 1 Cartridge

Box 

1) Select papers to decorate the outside of the box. Cut to fit side. Adhere to box. Stitch by hand or by machine down the middle of a length of a 8 inch length of ribbon. Pull on the end strings to softly gather the ribbon.
2) Next stamp the sweet background stamp from the Tiny Treats and add the heart and sentiment stamps. Punch out the stamped image using the Mega Scallop Circle Punch. Ink edges and add Heidi Grace heart embellishment.
3) Use Ribbon Adhesive to add gathered ribbon to box. This will make a soft stem. Then add foam pop dots to the backside of punched piece and adhere to box side. Add additional heart punches and pop with foam adhesive.

Paper Fortune Cookies 

1) First select the papers that you would like to use for the cookies. Then hand cut or use a die cut machine to cut several 3 ½ inch to 4 inch circles. The size you chose for the circle will determine the size of the cookie.
2) Next fold the circle in half. Do not make a hard crease along the middle but leave this as a soft fold pressing the circle together at the outer edge. Apply a small strip of adhesive to the inside of the circle at the outer edge. Press edges together to adhere.
3) Grasp the middle of the center of the fold and push this inward toward the outer edge of the circle. It can help to place your finger inside the soft fold to help guide the circle to fold and crease like a cookie.
4) If you prefer the cookie to stay tightly pressed together…you will need to add some adhesive to the inner pressed fold to make it hold. Otherwise they look fine with a fold and not tightly closed. Practice with a piece of play paper before you begin to see how much you need to crease and fold to get the look you like.

Fortunes 

5) Next select the stamps and messages you like. Work with a printer style paper that is light weight. Stamp the messages and hearts onto the paper working across the straight edge of the paper repeating your stamps. Then cut long strips of the stamped fortunes.
6) Once you have your fortunes stamped and cut, slide them into the cookies. It’s fun to leave an edge peeking out of the end for the recipient to pull. Stamp some extra fortunes to tuck into the box!
7) Add a little paper shred or additional fortunes and tuck the cookies into the box! Consider adding some real fortune cookies to the box along with the paper cookies!

Tips: If you’re not a stamper, you can handwrite the messages or even type them on your computer and print out strips.


Make larger cookies and attach small treats or gifts to the end of the fortune to be pulled out for a fun surprise.


This is a great gift for your sweetheart and children too! Just change up the messages and look to fit whom the gift is for!