Showing posts with label Crafts. Show all posts

Wednesday, March 6, 2013

Create a St. Patty's Day Party

Main Image

Something about St. Pat's wants me to run around and plan a fun party for my family! Maybe it's the color, that it's about luck and love and the color green!
Here's some fun ideas for how you can have a bit of of the luck of the Irish too! 

Sunday, March 3, 2013

Make a Whale of a ToteBag


This tote bag is so adorable we knew we had to share!


Tweet Spring Egg Craft

Main Image

How tweet I mean sweet are these? Here's the full instructions on how to make them! Just a note...consider using plastic or paper mache eggs to simplify the craft!  

Saturday, February 23, 2013

Turn a Shirt Into a Pillow

Main Image

You heard right! Take those unworn shirts and turn them into a stylish pillow thanks to Martha Stewart Crafts! Click here for the instructions!

Monday, February 18, 2013

Create a Clipboard Craft

Main Image

How fun is this idea to jazz up your office or craft space?
Click here to learn how to make your own!

Sunday, February 10, 2013

Create Your Own Gift Bags

Main Image

Create your own gift bags and stencils!

Perfect for holidays, birthdays classroom gifts and more!

Click here for the details! 

Thursday, February 7, 2013

Wednesday, January 9, 2013

Fun New Ways to Use Fabric Scraps

Main Image

How fun are these and what a perfect way to use all your scraps of fabric!
Click here for more info on how to make them! 

Monday, December 10, 2012

Needle Felted Holiday Ornaments

Main Image

Click here to see how to make these sweet ornaments for your holiday tree!

Sunday, November 11, 2012

Smoothfoam Snowman Door Project


How cute is this guy? Designer Jennifer Priest aka Hydrangea Hippo shares the full tutorial on how to make this cutie on her blog! 

Wednesday, August 1, 2012

"Everlasting Ice Cream" Kids' Craft Project

Are these not the cutest "ice cream sundaes" you've ever seen? And nope, they are not real...they are made from Styrofoam and paint!

The craft site Crafts 'n Coffee (which features crafts made from Styrofoam) has the full tutorial on how to make these fun everlasting ice cream sundaes and how to turn them into ornaments for your Christmas tree!

Click here to learn how!

Sunday, July 29, 2012

DIY: Paper Heart Valance


Now just how sweet is this idea from Honeybee Vintage? And think outside the box and consider for a boys room, stars or sports shapes! Maybe you're like me and love Halloween...this could be a fun decoration for an entryway or honestly just about anywhere! 

Click here to visit Honeybee Vintage for the full tutorial for this adorable project!

Friday, July 27, 2012

Fall Fabric Pumpkin Tutorial


When this Craft Mom spied this adorable fall craft...we just knew it must be shared!

Our friends at Riley Blake Designs and Designer Nancy from the SewHappyBlog provided this idea.
Click here to visit the Riley Blake blog and to see the full tutorial! 

Whoo Whoo Loves You Craft Idea

Melissa's DIe Cuts

Ptiowl8

When we saw this adorable projects from Designer Melissa Phillips from Papertrey Ink...we need we just had to share! Melissa shows you how to get more bang for your buck with die cuts.
 Take a peek at Melissa's blog for full instructions on this adorable craft!

For more information about Papertry Ink or to shop their amazing products click here!


Thursday, July 26, 2012

Sail Away Frame Craft Idea

user posted image

We spotted this craft on the Epiphany Crafts blog today. Designer Audrey Pettit created this fun craft project. Click here for the full tutorial and do post a comment on the Epiphany Crafts blog as well for a chance to win a prize package!   

Saturday, July 14, 2012

Amazing Tissue Box Craft Project

Have you ever wondered what kind of craftiness you could do with an empty tissue box? Well, wonder no more because Natalie at Creme de la Craft has the coolest tissue box craft project we've seen!

She used a tissue box, some styrofoam cups, newspaper, and Mod Podge to make an amazingly cute flower vase centerpiece!

Click here for the full tutorial!

Thursday, June 28, 2012

Fabric.com Crafts Sale


Now through July 2, Fabric.com is giving us 15% off all crafts (excluding embroidery machines, Sizzix, and Accuquilt).

This sale includes needlecrafts supplies, scrapbook albums, adhesives, punches, markers and pencils, trim and ribbon, stamps, and much more!

No coupon code required for the discount.


Monday, June 11, 2012

Fabric.com daily deal June 11th

Get ready to get hungry! Fabric.com's deal for today is 15% off all food and beverage-themed fabrics!


Wouldn't this be adorable on an apron or a little girl's jumper?

And if you order $35 or more worth of products, you get free shipping!


Friday, March 30, 2012

Spring Jewelry & Easter Decorations!


Hi all!

Hope you enjoy (or enjoyed) the show today! I try to bring on a bit or this and that to give a wide variety of ideas for you to work from.

Here's a few of the items I featured today..

Spring Flower and Bunny Pendants

Supplies:

Epiphany Crafts Round 25 Studio Shape Tool, Bubble Caps
Epiphany Crafts Scallop Charm Settings (available online and in store at Archiver's, Jo Ann's and Hobby Lobby!)
We R Memory Keepers Paper Collection
Chains (from Hobby Lobby)
GlueArts Adhesive Squares (www.gluearts.com)

These are as easy as 1,2 and yes...3..

1. Select your design...line up you Epiphany Crafts Tool...place a Bubble Cap inside.
2. Punch out design
3. Using GlueArts Adhesive Squares adhere to Charm Settings..

seriously...1,2,3....  and here's a link to a fun place online to download some more images!


Egg Jar

Supplies:

Amazing glass jar (I love to go to Home Goods for mine!)
Eggs (from Michael's Craft Stores)
Moss (also Michael's Craft Stores)
Bunny (up to you if it's chocolate, wood etc)


Spring Totes (I love these as they're perfect to use for the egg hunt...and then all the days after!)

Supplies:
Canvas Totes (Hobby Lobby)
Martha Stewart Paints from Plaid
Martha Stewart Templates and Burshes
Beads
Wood Felt
Sizzix die cut machine
Handbehg Felts wool balls (handbehgfelts.com)


Large Pink Flower:

1) Use the GlueArts Adhesive Squares to adhere the beads forming the stem to the bag.

2) Next paint on leaves and grass using the Martha Stewart All Purpose Paints and brushes. I outlined the leaves by hand-stitching. This step can be omitted for kids.
  
3) Use the Sizzix Big Shot to cut the felt flowers from a variety of colors of felt. (Wool felt is easier to work with if you can find that. You can hand cut the shape as well) Apply Glue Arts Fabric Bond to the backside of your felt. Iron onto the canvas bag to heat the adhesive and bond onto the bag.  

Tip: to make this child friendly…use the Extreme Adhesive Squares in the full size and apply the squares to the backside of the felt and then adhere to the bag. The Extreme Squares are designed to adhere to fabric, canvas and more!

4) The bottom flowers are hand-painted on the tips and then felt flowers layered over the top with a felt ball to finish it off and give dimension. Each flower was adhered using several Adhesive Squares.  

Tip: These can also be sewn with a sewing machine or hand-stitched as well.

5) Adhere butterfly bead with Extreme Adhesive Squares.

6) Tie a ribbon around the handle. Use the Micro Extreme Adhesive Squares to hold the ribbon tails in place on the bag.

Tip: If you do not have access to a diecut machine hand cut your shapes. Also this bag would be fun to personalize with a child’s name, Grandparents, special teacher! And best…this bag took just minutes to make and will be a favorite for years to come.


Felt Easter Bunny Hair Clip Clippee
My 1st Easter Tutu Outfit

The ever so sweet Easter Top and Hair Clip provided by Bella Due! Visit their online store to see everything they carry or stop by the store "I Am What I Am" on main street in St. Charles to see items in person!

Other little items...the stretchy headbands were purchased at Hobby Lobby...flower info can be found here. Little picture frame from the dollar bin at Michael's. Wreath info...just page down a bit and you'll see it there.


Thanks for all your support! 

Thursday, March 29, 2012

Easy to Make Spring Wreath!


This is my most recent craft featured in the St.Louis Post Dispatch. I love it because not only does it brighten up my door..it's kid friendly!

Spring is in the air, and that means time to brighten up your home with new décor. With Easter on the horizon, it's the perfect time to use all the beautiful crafts and goods you can find in your local craft store to help push those winter blahs right out the door.
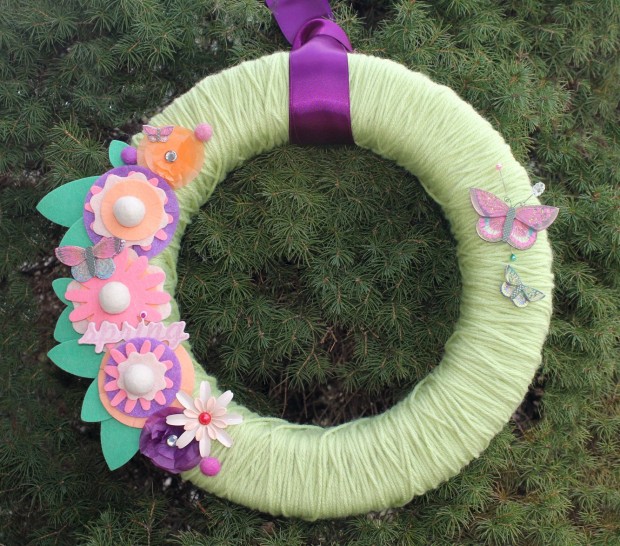
One of the best ways to capture that feeling is to welcome those to your home with a spring wreath. And even better, it's kid-friendly and makes for an easy craft everyone can help with.
SUPPLIES NEEDED
• Styrofoam wreath
• Loops & Thread "Soft Fern" yarn (Michael's stores)
• Sizzix flower and leaf dies (sizzix.com)
• Pebbles in My Pocket paper flowers
• Sassafrass Lass metal flower
• Glue Arts Extreme adhesive squares (gluearts.com)
• K & Co. dimensional butterfly stickers
• Handbehg Felts wool balls (handbehgfelts.com)
• May Arts ribbon (mayarts.com)
• Wool felt, fabric, buttons
Step 1 • Wrap the wreath with yarn, covering the entire wreath. Use a straight pin or adhesive square to adhere yarn on backside of wreath.
Step 2 • Select your dies and felt colors. Handcut or diecut your flower shapes. I used sizes ranging from 3 3/4 inches to 4 3/4 inches. Kids can choose to use papers and punches instead of felt and dies.
Step 3 • Build the flowers. I used three to four flowers in various sizes. I simply layered the flowers, changing them around until I liked the color combinations. Once you settle on how you like them, adhere them together using GlueArts Extreme adhesive squares.


Step 4 • Adhere the flowers to the wreath using adhesive squares. I selected a few flower stickers, added some butterfly stickers and a chipboard 'spring" sticker and then finished off the tops of the flowers with the fun felted wool balls for added dimension.  
Step 5 • After you've added the flowers you can personalize the wreath or just leave it as is. Consider adding a banner that says "welcome spring" or an initial for your last name. I added a beautiful ribbon.


Read more: http://www.stltoday.com/lifestyles/home-and-garden/home/spring-wreath-offers-visitors-a-happy-welcome/article_2a350b8d-d4a4-59ad-abb6-1f4c8cdeb18c.html#ixzz1qW54vuCM