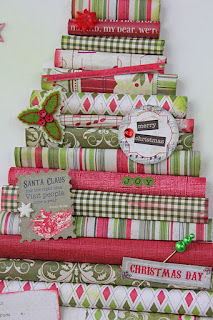
Rolled Paper Christmas Tree Canvas
Designer: Julia Sandvoss
Supplies:
Authentique “Wonder” Paper, Diecut & Sticker Collection
Colorbox Chalk Inks: Warm Red, Creamy Brown, Teal and Moss Green
Canvas 10 by 14 (Hobby Lobby)
Core-dinations Cardstock
Ranger Stickles
Maya Road Mists Spray & Pins
Epiphany Crafts Studio Shape Star Tool & Star Bubble Caps
Making Memories Assorted Holiday Embellishments
Tree Instructions:
1) Begin by choosing a variety of patterned papers and solid cardstock colors. You can mix and match brands however to try to stay within the same color families for the best look. Cut strips of paper approximately 1 1/2 inches wide by 12 inches long. Use a pencil or dowel to help roll the papers.
Begin rolling the papers and secure with a strip of either GlueArts Perma Tac adhesive or use Extreme Adhesive Squares. Continue to roll about 16 to 18 papers in a variety of prints and solids.
2) Next ink the rolled papers to give a finished look to the edges. Then lay out the rolled papers and decide which print and solids you like in which order. Once you have laid them out as you like…it’s time to start working on the canvas.
3) Place the rolled papers onto the canvas allowing a space at the bottom for a trunk. Once you’ve laid them out…it’s time to trim the papers making each one just a bit shorter as you work your way to the tip top of the tree. Keep in mind, you can use some of the rolled pieces you’ve cut off for the top pieces of the tree. Or…hold onto your scraps and make a small tree shaped ornament later!
4) Once the entire tree has been laid out and cut to size…it’s time to adhere to the canvas using the GlueArts Extreme Adhesives Squares. Apply a square or two to the backside of the papers and press down onto the canvas working your way to the top of the tree.
5) Next it’s time to decorate the tree with diecuts, felt embellishments, stickers and more! Use the GlueArts U Cut It Foam to add dimension and depth to the embellishments so they lift off the tree just a bit. Have fun with this step…this is where it really comes together.
6) Add a hand cut trunk and decorative edge cut from one of the papers for the trunk of the tree. Add a few sprays of the Maya Road Mists to canvas for a light color. Finish off with Epiphany Crafts Stars with Bubble Caps tops for a shiny addition.


No comments :
Post a Comment